Baked Potato Wedges

Spring is the perfect time for bbq’s and  picnics in the park. Whether you cook hot dogs or burgers, fries should be a side dish. However, homemade fries is an easy dish to ruin. You want that crispy outside with a soft, creamy inside but without the grease or oil.

An alternative to deep-frying the fries is to bake them as potato wedges and get that perfect texture inside and out. This cooking method is healthier, faster and much easier to complete.

Ingredients:
Russet potatoes(2 per person), washed and cut into eighths.
1 tablespoon olive oil
1 teaspoon onion powder
1 teaspoon garlic powder
1/4 teaspoon ground black pepper
1/4 teaspoon salt

First, pick out some medium-sized russet potatoes. The recipe I am using was given to me by Sam Handam, a local restaurant owner. He said he uses about two potatoes per person.

“Unless they are small of course then I use more,” he said jokingly. Sam said he uses this recipe at personal bbq’s and his restaurant which serves fish and chips.

“I like wedges more for bbq’s because they are thicker and you get a better potato taste,” he said.
Directions:

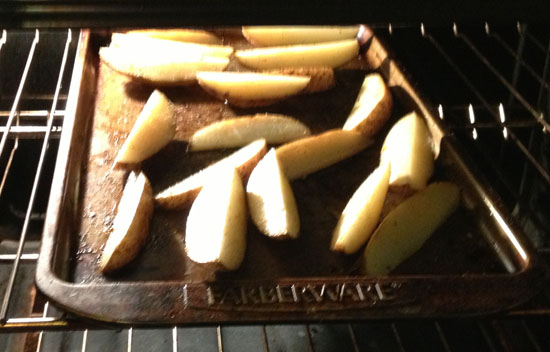
• Heat the oven to 425 degrees.

•Cut the potatoes into eighths and place them in a bowl with the olive oil and spices.

•Toss the wedges in the bowl to evenly coat each one.

•Place the wedges on a baking sheet and put them in the preheated oven and bake for 25-30 minutes. Then let cool for about 5 minutes before eating.

123

One customer Ruben said he prefers these type of fries over any from a fast food place. “I prefer my fries homemade because they taste better and are fresh.” Ruben goes to Sam’s restaurant a couple of times a week. He enjoy’s this place more than other fish and chip restaurants because of the “quality” of food.

My only adjustment to this recipe when I recreated it was that before I placed the wedges in the oven to cook, I cooked them in boiling water for about 5 minutes. My reason for doing so was to assure that all the potatoes cook evenly and get a more crispy texture. This also reduces cooking time in the oven to 20-25 minutes.

Other than that, I liked this recipe because it is simple and healthier than traditional french fries. You can adjust the seasoning and add your own twists. Sometimes I add cajun seasoning to enhance the flavor. Just don’t add as much salt if you add other seasonings. Enjoy!


The Bread Boy

While I was interviewing a restaurant for a video, I met a guy named Jose. He stood out to me because he loved to bake. His passion for baking lead him to earning a job baking a variety of different breads for local restaurants and food trucks. He has taken of the role of bread boy at his current job.

“I don’t know who came up with the name but I like it,” said Jose.

He said that we wakes up around dawn to head to work and start making the bread at the restaurant.

“He has to make bread for about a dozen different restaurants and vendor,” said his boss Sam. “He feels like pressure to be on time and ready to go.”

One of his favorite breads to make accompanies the delicious Sonora Hotdog for a few local food trucks. A Sonoran dog is a Mexican style hotdog fixed with a variety of different toppings such as chile beans, salsa, guacamole, green peppers, etc.

“I really enjoy eating the Sonoran dogs especially from the ones I deliver bread to. My family does too,” he said.

Jose has been baking for several years. He said he wasn’t interested in it until he got a job working at Marylins. He worked his way up to making bread and decided to stay doing it.

“It’s fun,” he said while laughing. “I think I bake more than my mother does.Oh dios mio” (which means oh my gosh in Spanish).

Jose was glad to share a delicious recipe to accompany your next Sinaloa dog or any hotdog. He didn’t have his own recipe at first but over the years he adjusted to using only one instead of a different one for each vendor.

The ingredients are:

 To begin, Jose combines the lukewarm milk, egg, butter, sugar, bread flour, potato flakes, salt and yeast in a mixing machine. When doing this at home you can use any standard mixer. Mix the dough on low for 8-10 minutes. It should be smooth and elastic. You should let the dough rest for 1-2 hours. Take the dough out of the mixer and cover it on a pan with a towel.
Next:
  • He places parchment paper on his baking sheets.
  • Divide dough into 3 equally sized pieces and form into logs.
  • Divide each log into 5 equal pieces for standard sized rolls.
  • Make each piece out into an oval.
  • Press an indentation down the length of the center of the oval with the side of your hand.
  • Roll the dough up around the indentation.
  • Transfer to the baking sheet
  • Leaving the dough about 1 inch apart, and let rise for about thirty minutes
  • Preheat oven to 375°F.
  • Brush the dough with buttermilk.
  • Bake for 18-22 minutes
  • Let the bread cool for a few minutes
  • Make a slice down the center of the top of the roll nearly through to the bottom.
  • Then open the bread to put a hotdog inside.

Jose randomly chooses a bread to taste and assure that it is up to par.

“He always finds ways to make his job fun and easy,” said Sam. “He is a joy to be around.”

Jose sometimes delivers the bread personally to the different vendors.

“I love seeing their faces when I arrive with the bread. It makes my job good.”

This recipe was the first that Jose mastered. He practiced everyday and after a few weeks, he no longer had to read it off of a piece of paper. He said he will never eat a prepackaged hot dog bun again. “Fresh is the way to go,” he said.

The ingriedients for this recipe can be found in most pantries becasue they are typical everyday cooking items. So why buy bread when it is so simple and easy to make. It will compliment any hotdog nicely.

Albondigas Soup

Albondigas are a traditional Mexican meatball soup. When most people see “meatball soup” on a menu, they aren’t curious to order it. But it taste a lot better than you think. Especially when it is made from scratch with authentic flavors.

One of the best bowls of albondigas I’ve eaten was made by Chely Rodriguez. Chely spent the early years of her childhood in Sinaloa, Mexico. It was there that she was introduced to cooking with different spices and fresh ingredients.

Chely moved to Arizona with her family and learned to cook by watching her mother and other sisters. She prefers cooking homemade meals for her children rather than ordering fast food because she enjoys cooking and it is healthier for them. They also get to taste food cooked from their culture.

“I love to cook every mean for them,” she said. “No matter how busy I am, I still want them to enjoy a good meal,” she said.

Chely uses a recipe she learned over the years but adds new twists on it each time. For instance, albondigas are usually cooked with carrots, celery and potatoes in it. This time Chely substituted the potatoes and celery for broccoli and cauliflower.

“I use different vegetables because it gives my children a chance to try new things and they don’t even notice it’s good for them.”

On of the most important tips to remember when making albondias is to properly season the meatballs because that is where most of the flavor originates from.

Ingredients for the albondigas or meatballs:

  • 1 pound of beef (half ground beef and half ground pork loin)
  • 1/4 onion finely chopped
  • 1 garlic clove finely chopped
  • 2 tablespoons of rice, previously washed and strained
  • 3 tablespoons of ground bread(per meatball)
  • 1 teaspoon of cumin 
  • salt added according to taste

Other:

  • 2 Tbsp olive oil
  • 1 large onion, chopped
  • 1 large garlic clove, minced
  • 3 quarts of chicken stock or beef stock OR water OR a mixture of both
  • 1/2 cup of tomato sauce
  • 2 large carrots, peeled and sliced
  • 1/3 cup of raw white rice
  • 1/4 cup of chopped parsley
  • 1/2 cup of fresh cilantro
  • salt and pepper to taste
  • 1 head of broccoli
  • 1 head of cauliflower

media23

In a large stock pot, bring water/chicken stock mixture, carrots, broccoli, onion, and bouillon cubes to a boil. Reduce to a medium simmer, stirring occasionally, approximately 10 minutes.

Prepare the meatballs. Mix rice into meat, adding cilantro leaves and parsley, salt and pepper. Mix in raw egg. Form mixture into 1-inch meatballs.

Cover and cook 20 minutes, or until meatballs are no longer pink in center and vegetables are tender. Serve with sprinkled cilantro for garnish.

media2

“I want my children to learn about their Mexican culture as well as their American one. I cook a variety of food for them and this dish is one that is close to home,” she said.

Chely no longer has to write down her recipes. When she knows she wants to make somethings, the recipe just comes to her from all her years on experience. And if she is stuck on something, she will just call and ask her mother about a recipe.

These albondigas were simple to make and still were full of flavor. Her recipe was better than one used at a restaurant because she’s cooked in Mexico and learned how to master to cuisine using authentic spices and seasonings. She buys the vegetables locally from a market near her home. You can add fresh cilantro on top before eating for a better taste and add tortillas on the side. This is one meal that is great for those cold days or holidays when the family is together. Enjoy!

Marilyn’s Fish and Chips

If you are ever in the mood for fresh, homemade seafood or bar food, this is the place to go. The owner Sam ensures that the quality of food is up to par. He goes the extra mile and makes all of his sauces from scratch each morning. They have a bakery in the back of the restaurant, which he uses to freshly bake all the bread for his various sandwiches and burgers. He even uses that bread to sell to the local hotdog stands. This restaurant is family run and operated, so it has a great family atmosphere. You can often find Sam, his son and wife cooking up the food or taking orders. Aside from their perfected fish and chips, they offer a variety of sandwiches like chicken sandwiches, Philly cheesesteaks, cheeseburgers, fish sandwiches and etc. And for dessert they offer a variety of ice cream flavors like mint chocolate chip, butter pecan, strawberry cheesecake, which are all made from scratch in the back of the restaurant. Ty it out and you won’t be disappointed.

Sopa De Vegetal

Sopa  is a traditional Mexican soup. It is an easy dish that is often made as a snack or a side to a main course. It is usually called sopa de fideo/pasta depending on which type and shape of noodle or pasta you use. You can add plenty of vegetables or different meats and spices to kick up the flavor. Sopa is just the basic soup and when you add more ingredients is when the name changes, for example, sopa de vegetal and sopa de pollo. However, these kinds of sopa are different from chicken soup and vegetable soup because it uses the pasta.

A few years ago, the restaurant Matador, a Mexican eatery, in downtown Phoenix was popular and served sopa de vegetal. It was delicious and I would go there with my Nana and eat that dish often. It had fideo, tomatoes and carrots.

fideo

However, when the restaurant closed its doors, I could no longer find a Mexican food restaurant that offered this dish on the menu. But since my mother made this dish regularly, I decided tor recreate it using my own recipe and see if I could match the same flavor profile as Matador did with their sopa.

Sopa is simple. The pasta used already comes prepackaged. It is at most grocery stores in the Latin American food aisle. Just one package(7 ounces) will do the job. You will also need:

  • 5 diced tomatoes or 1 can diced tomatoes(14.5 ounces)
  • 4 cups of liquid (water or chicken stock)
  • 1 small onion, chopped
  • 1 clove garlic, chopped finely
  • 1 cup of fresh, chopped cilantro
  • salt and pepper to taste
  • 1 teaspoon of olive oil
  • 2 sticks of celery, chopped
  • 2 carrots, chopped

Start of by heating the olive oil. The key to making this recipe successful and authentic is to fry the pasta before actually cooking it with the other ingredients. Once the oil is heated, add the chopped onions and garlic. The flavor will infuse the oil. The onions should be chopped in strips. Then add the pasta and stir it frequently so it won’t burn. This will take about a minute and you will see the color change.

For the tomato sauce, you can use a can and it will be easier. However, for the authentic taste, use fresh tomatoes. In either a food processor or blender, add the tomatoes with chicken stock or water. Add some salt and pepper then blend it all together. Add it to the pasta, onions and garlic.

To make this sopa de vegetal, add the carrots and celery. Make sure that the tomato mixture covers the vegetables in order for them to properly cook. Then cover the sopa and let it cook for 20-30 minutes or until the pasta and vegetables are cooked. It would help to cover the pan you are cooking the sopa in. Be aware that sopa absorbs the water/tomato mixture so you may need to add more water and stir often so it won’t stick to the bottom of the pan. And don’t use a small pan because it will eventually spill out.

You may need to add more salt and pepper. You might also want to try adding a cube of chicken bullion to enhance the flavor especially if you are not using chicken stock.

I like my sopa with broth so I add water throughout to thin out the tomato mixture.

photo


You can top it off with fresh cilantro, cheese, or whatever other toppings work well for you. This truly is one authentic Mexican dish that is simple for anyone to make. And it is as cheap as it gets! Yet, it still has those delicious flavors that a five-star dish would. I hope you enjoy this dish as much as I did. It was nice to know I could recreate this dish after years of having it in a restaurant. Enjoy!


Thai’d Up in Downtown Phoenix

Downtown Phoenix has grown tremendously over the last few years. It now offers a wider variety of restaurants and food from different cultures. More places are now offering discounts to students who attend ASU. This lead me to try a few new places near Cityscape.

One of my favorite places was Thai’d Up. I was a little hesitant to try Thai food because I’ve never had it before and this place was just opening up for business.

Before trying this place, I decided to find out some information about the history of Thai’d Up. I decided to stop by and grab menu. I was greeted by three women who I later found out were the owners.

They opened the restaurant based around cuisines from Thailand. The women have combined their recipes, which were passed down from earlier generations, and cooking experience of 30 years to create food adhering to four prominent flavors: sweet, sour, bitter and savory.

The menu was extensive but the dish that stood out to me immediately was L2, the broccoli delight with chicken. (You can pick any type of meat, fish, tofu or vegetarian)

I am a broccoli fanatic. It’s my favorite food to eat especially with Asian cuisine and spices. I knew if I loved this dish that I would pretty much be this places number one customer. That’s how intense my love for broccoli is.

The menu allows you to pick how spicy you want a dish since Thai food is typically cooked with garlic and crushed red pepper flakes. It’s all combined in a wok to created crisp, explosive flavors and textures. The broccoli and chicken is mixed with carrots and the Thai’d up sauce, which has been a family recipe for generations and the owners do not share it with anyone except each other. They won’t allowed anyone to alter the original recipe because they want to keep the flavors as close to the ones right from Thailand as they can.

The dish was very generous in size and came with a side of tofu soup. It was extremely flavorful and the broccoli was perfect. I never thought Thai food would be so tasty and delightful.

11

The Thai’d Up sauce, which was passed down from generations, was definitely the secret ingredient that made this dish spectacular. It was smooth, spicy and had depths of flavor that adhered to every taste bud in someway. The fact that the owners only use locally grown, fresh produce also made this dish extra special. And to top the day off, Thai’d Up gave me a 10% discount off my bill just for being an ASU student with my sun card. It doesn’t get any better than that.

Not only did Thai’d Up have a fascinating story behind it, but the food was excellent as well. And the best part is that it is college student friendly and supports locally grown produce.

My Version of a Family Favorite

Food has always been a major part of my families bonding time. I grew up in a very “nontraditional” Mexican home. My parents never really cooked our cultures food. Most of my friends mothers would make homemade tortillas and tamales weekly but my mother didn’t. It was fun to joke about it but I would wonder what I was missing out on. One year my dad came home and began making green chili stew using my Nana’s recipe. It was amazing to see him make something so new to me. And it was the most delicious food I’ve eaten to this day.

Ever since then, whenever I go to a mexican restaurant, I have to sample their green chili stew whether it be in a burro or accompanied by rice and beans. I’ve tried some pretty good ones and some that were less than decent. But none of these recipes compared to my father’s recreation of my nana’s green chili stew. The main reason his is unique is because he uses potatoes in the recipe, which is the only time I’ve ever had it this way in green or red chili.

However, this recipe takes a few hours to make and is only really made on special occasions like my birthday or my dogs birthday because she loves it too. So when I began cooking, this was one of the first recipes I wanted to try. But it is challenging and I saved it until now.

I watched my father cook this dish a few times but he is very secretive about the exact recipe. And since I’ve watched tons of cooking shows and read different cookbooks, I decided to make my own and try to replicate my father’s recipe.

  • 2 white onions, chopped
  • 2 pounds of russet potatoes, chopped (1-inch cubes)
  • 1 pound tomatillos (husked, rinsed, and halved)
  • 2 pounds of pork shoulder or “pork butt” (chopped 1-inch cubes)
  • 3 jalapenos, stemmed, seeded and halved
  • 2 garlic cloves, chopped
  • 1 can diced tomatoes in juice
  • 4 tablespoons vegetable or canola oil
  • 5 cups water or chicken stock
  • 1 cup chopped fresh cilantro leaves
  • Salt and Pepper to taste
  • 1/2 a cup of flour
  1. Put oil in a large soup pot or dutch oven. Cook the pork until it is browned then add the onions, potatoes, and garlic. Add the water or chicken stock. Add salt and pepper. Add water then tomatoes, tomatillos, and cilantro and jalapenos. Bring to boil.
  2. In order to thicken the chili, you will need to add flour. Brown the flour in a skillet. This should only take a minute to a minute and a half because any longer will burn it and leve you chili too smokey. Make sure the flour isn’t in clumps. Whisk out any clumps.
  3. Reduce the heat to low and let the chili simmer for an hour or so until the meat and potatoes are tender. Stir it every few minutes. Add additional salt and pepper to taste.

Many people top off their green chili with cheese or crisp tortilla strips. Any toppings work well and don’t forget the warm tortillas!

When I made this recipe I made both red and green chili. Both are similar except for the chiles and peppers use. Rice and beans make great sides for the meal.

0-1

This was a successful recreation. I believe I made this exactly like my father’s recipe. He enjoyed it and it was a great bonding experience.

As for the ingredients I used, I was able to go to the Farmer’s Market at the ASU Tempe Campus at the end of January and get some of the fresh produce. It was convenient for any college student.  For the other ingredients, I went to a local Pro’s Ranch Market after hearing positive reviews about it being Arizona’s 2012 Retailer of the Year. It was budget friendly and the selection of meats and spices were abundant.

Overall, this dish was satisfying and would be easy for college students to make especially with a wide variety of resources such as farmers markets available. So if you are looking for a hearty, delicious dish to make with local ingredients, this is definitely a winner!

College Food Experiences

I knew when I started college that I was going to be introduced to a whole different world of food. There’s the college myth called the freshman 15, which referes to incoming freshman gaining at least 15 lbs. Most say it’s from eating all of the delicious food that campuses have to offer. Coming from high school cafeteria food, I was amazed to see how many options ASU had to offer. And being in Downtown Phoenix was even better. Located in the heart of teh city is home to dozens of new restaurants. Some family owned and others corporate run. Neverthless, I vowed to try at least all of these restaurants within my college career. And I have come across plenty of great places with unique themes and menus. I know starting this new semester will mean exploring new restaurants and places to grab a bite.! Wish me luck!